- A+

在前面的文章中,已经讲解了Spring Boot 如何实现自动化配置的原理,其中包括以下几点内容:
- springboot主程序执行时会通过@EnableAutoConfiguration注解找到META-INF/spring.factories文件中的自动配置类。
- 自动配置类一般可以认为是以AutoConfiguration为结尾的JavaConfig形式的配置文件类,而如果需要这些配置文件加载至Spring容器中,必须满足以@Condition为注解修饰的条件。
- 自动配置类可以通过以properties文件结尾的类中取得全局配置文件中的配置,比如:spring.redis等,而以properties文件结尾的类则是通过@ConfigurationProperties注解与全局配置文件中的配置属性进行绑定的。
- @EnableConfigurationProperties注解将以properties为结尾的类信息自动导入至spring容器中并完成所有组件的自动配置。
我们想要实现自定义Starter配置,必须遵守以上内容的配置。
到底什么是Spring Boot Starter?
Starter其实就是一组简单方便的依赖组件,可以按照您的需求简单开启Spring与相关技术的一站式服务,无需去找相关技术的示例代码以及测试代码,直接引用Spring Boot 提供的 Starter 就可以满足您的相关需求,并且可扩展性强。
例如:如果想引入Spring和Redis数据库进行访问,可以直接引用spring-boot-starter-data-redis依赖。
Spring Boot 实现了诸多常用的Starters,可以参考Spring Boot 官方中文文档进行查看,文末会给出文档链接。
实现自定义 Spring Boot Starter
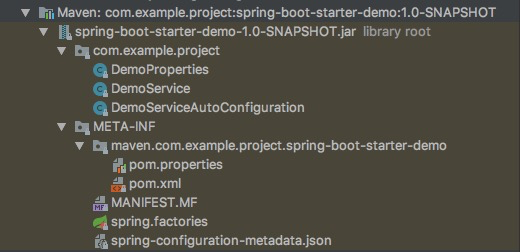
首先,我们来看下最终定义后的目录结构,如下图:

- 创建Maven工程
这里只需要创建一个普通的maven工程即可,选择archetype为maven-archetype-quickstart,定义好所属业务的GroupId以及artifactId信息。创建自定义Spring Boot Starter 需要引用spring-boot-autoconfigure、spring-boot-configuration-processor两个依赖。具体Pom文件如下:
<?xml version="1.0" encoding="UTF-8"?>

<project xmlns="http://maven.apache.org/POM/4.0.0" xmlns:xsi="http://www.w3.org/2001/XMLSchema-instance"
         xsi:schemaLocation="http://maven.apache.org/POM/4.0.0 http://maven.apache.org/xsd/maven-4.0.0.xsd">
    <modelVersion>4.0.0</modelVersion>

    <groupId>com.example.project</groupId>
    <artifactId>spring-boot-starter-demo</artifactId>
    <version>1.0-SNAPSHOT</version>

    <name>spring-boot-starter-demo</name>
    <!-- FIXME change it to the project's website -->
    <url>http://www.example.com</url>

    <properties>
        <project.build.sourceEncoding>UTF-8</project.build.sourceEncoding>
        <maven.compiler.source>1.7</maven.compiler.source>
        <maven.compiler.target>1.7</maven.compiler.target>
    </properties>

    <dependencies>
        <dependency>
            <groupId>junit</groupId>
            <artifactId>junit</artifactId>
            <version>4.11</version>
            <scope>test</scope>
        </dependency>
        <dependency>
            <groupId>org.springframework.boot</groupId>
            <artifactId>spring-boot-autoconfigure</artifactId>
            <version>2.0.0.RELEASE</version>
        </dependency>
        <dependency>
            <groupId>org.springframework.boot</groupId>
            <artifactId>spring-boot-configuration-processor</artifactId>
            <version>2.0.0.RELEASE</version>
            <optional>true</optional>
        </dependency>
    </dependencies>

    <build>
        <pluginManagement><!-- lock down plugins versions to avoid using Maven defaults (may be moved to parent pom) -->
            <plugins>
                <!-- clean lifecycle, see https://maven.apache.org/ref/current/maven-core/lifecycles.html#clean_Lifecycle -->
                <plugin>
                    <artifactId>maven-clean-plugin</artifactId>
                    <version>3.1.0</version>
                </plugin>
                <!-- default lifecycle, jar packaging: see https://maven.apache.org/ref/current/maven-core/default-bindings.html#Plugin_bindings_for_jar_packaging -->
                <plugin>
                    <artifactId>maven-resources-plugin</artifactId>
                    <version>3.0.2</version>
                </plugin>
                <plugin>
                    <artifactId>maven-compiler-plugin</artifactId>
                    <version>3.8.0</version>
                </plugin>
                <plugin>
                    <artifactId>maven-surefire-plugin</artifactId>
                    <version>2.22.1</version>
                </plugin>
                <plugin>
                    <artifactId>maven-jar-plugin</artifactId>
                    <version>3.0.2</version>
                </plugin>
                <plugin>
                    <artifactId>maven-install-plugin</artifactId>
                    <version>2.5.2</version>
                </plugin>
                <plugin>
                    <artifactId>maven-deploy-plugin</artifactId>
                    <version>2.8.2</version>
                </plugin>
                <!-- site lifecycle, see https://maven.apache.org/ref/current/maven-core/lifecycles.html#site_Lifecycle -->
                <plugin>
                    <artifactId>maven-site-plugin</artifactId>
                    <version>3.7.1</version>
                </plugin>
                <plugin>
                    <artifactId>maven-project-info-reports-plugin</artifactId>
                    <version>3.0.0</version>
                </plugin>
            </plugins>
        </pluginManagement>
    </build>
</project>
-
定义属性配置
在上述自动化配置原理中,我们知道应用程序的相关配置是通过ConfigurationProperties注解进行相互绑定的,所以需要设置一个与配置文件相互绑定的配置类。如下图:
package com.example.project;

import org.springframework.boot.context.properties.ConfigurationProperties;

/**
 * @author mengxi.zh
 * @Description starter相关配置类
 * @date 2019-10-11 13:57
 * @Copyright 2019 Alibaba.com All right reserved.
 */
@ConfigurationProperties(prefix = "spring.demo")
public class DemoProperties {
    private String id;
    private String name;
    private int age;

    public String getId() {
        return id;
    }

    public void setId(String id) {
        this.id = id;
    }

    public String getName() {
        return name;
    }

    public void setName(String name) {
        this.name = name;
    }

    public int getAge() {
        return age;
    }

    public void setAge(int age) {
        this.age = age;
    }
}
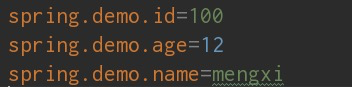
注意:这里使用的配置前缀是spring.demo,也就是说如果引用该starter,配置文件中需要配置以spring.demo为前缀的配置信息,才能获取到相关配置信息,比如spring.demo.id = 100
- 定义starter中的核心类
这里说的核心类,其实就是该starter需要实现一些什么样的功能或者说是实现哪些通用的业务逻辑,通过自动化配置后,将该服务所属的Bean注册到SpringContext中,在应用程序内部可以随时使用。
package com.example.project;

/**
 * @Description starter相关核心类
 * @Author mengxi.zh
 * @date 2019-10-11 13:59
 * @Copyright 2019 Alibaba.com All right reserved.
 */
public class DemoService {

    private DemoProperties demoProperties;

    public DemoService() {

    }
    public DemoService(DemoProperties demoProperties) {
        this.demoProperties = demoProperties;
    }
    /**
     * 核心方法
     */
    public void saySomething() {
        System.out.println(
            "Hello EveryOne,i am " + demoProperties.getName() + ", my cardId is " + demoProperties.getId()
                + " , my age is " + demoProperties.getAge());
    }
}
- 定义Starter的自动配置类
我们查看Spring Boot 实现的一些常用的Starter类名,一般都是以AutoConfiguration结尾的类,该类的功能是通过EnableConfigurationProperties注解以properties为结尾的配置类文件信息,将符合条件的Bean进行自动化注册至Spring容器中。
package com.example.project;

import org.springframework.beans.factory.annotation.Autowired;
import org.springframework.boot.autoconfigure.condition.ConditionalOnClass;
import org.springframework.boot.autoconfigure.condition.ConditionalOnMissingBean;
import org.springframework.boot.autoconfigure.condition.ConditionalOnProperty;
import org.springframework.boot.context.properties.EnableConfigurationProperties;
import org.springframework.context.annotation.Bean;
import org.springframework.context.annotation.Configuration;

/**
 * @author mengxi.zh
 * @Description 自动配置类
 * @date 2019-10-11 14:26
 * @Copyright 2019 Alibaba.com All right reserved.
 */
//Configuration表示配置类
//EnableConfiguration类Properties与配置类进行绑定
//ConditionalOnClass当类路径classpath下有指定的类的情况下进行自动配置
//ConditionalOnProperty当配置文件中example.service.enabled=true时进行自动配置,如果没有设置此值就默认使用matchIfMissing对应的值
@Configuration
@EnableConfigurationProperties(DemoProperties.class)
@ConditionalOnClass(DemoService.class)
@ConditionalOnProperty(prefix = "spring.demo", value = "enabled", matchIfMissing = true)
public class DemoServiceAutoConfiguration {

    @Autowired
    private DemoProperties demoProperties;

    @Bean
    //当容器中没有指定Bean的情况下,自动配置PersonService类
    @ConditionalOnMissingBean(DemoService.class)
    public DemoService demoService() {
        DemoService demoService = new DemoService(demoProperties);
        return demoService;
    }
}
上述自动化配置类,其实很简单,就是在Spring Boot 主程序启动后将DemoService实例化并且注入至Spring容器中。
- 定义spring.factories文件
在上述的Starter目录结构中可以看到,我们还需要定义一个spring.factories文件,该文件存在与src/main/resouces/META-INF路径下,定义这个文件的目的就在于Sping Boot 主程序启动后会通过@EnableAutoConfiguration注解找到META-INF/spring.factories文件中的自动配置类。找到相关的配置类后,通过配置信息以及配置类中的条件判断对服务所属的Bean进行注册。
spring.factories内容如下:
org.springframework.boot.autoconfigure.EnableAutoConfiguration=com.example.project.DemoServiceAutoConfiguration
通过上述几步配置,就完成了一个简单的自定义starter逻辑。
- 自定义starter打包
配置完自定义starter后,需要将该starter打成jar文件,这样别的项目才可以真正使用到自定义starter。
mvn clean install 本地打包
mvn clean deploy 部署至远程仓库
验证自定义 Starter
完成Starter的自定义打包后,我们就可以创建一个新的Spring Boot 项目进行验证了。
- 引入依赖
我们要使用自定义Starter,就必须引用打好的jar文件。Pom依赖如下:
       <dependency>
            <groupId>com.example.project</groupId>
            <artifactId>spring-boot-starter-demo</artifactId>
            <version>1.0-SNAPSHOT</version>
        </dependency>
完成依赖后,可查看相应的jar文件,如下图:
- 定义application.properties文件
引入依赖后,我们就可以在全局文件application.properties文件中配置所需的信息,如下图:
- 编写测试类验证
package com.alibaba.starter.test.springboot.starter.test.demo;

import com.example.project.DemoService;
import org.junit.Test;
import org.junit.runner.RunWith;
import org.springframework.beans.factory.annotation.Autowired;
import org.springframework.boot.test.context.SpringBootTest;
import org.springframework.test.context.junit4.SpringRunner;

/**
 * @author mengxi.zh
 * @Description 测试自定义starter
 * @date 2019-10-11 15:01
 * @Copyright 2019 Alibaba.com All right reserved.
 */
@RunWith(SpringRunner.class)
@SpringBootTest
public class MyStarterTestDemo {
    @Autowired
    private DemoService demoService;

    @Test
    public void testDemoService() {
        demoService.saySomething();
    }
}
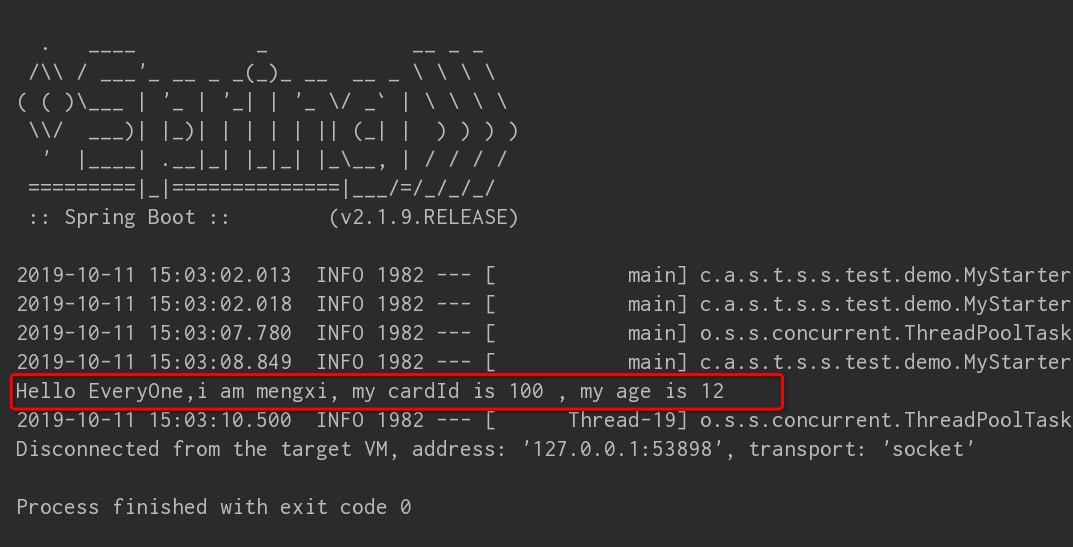
启动测试类后,查看日志可以看出自定义Starter中的配置信息已生效。如下图:
至此,自定义Spring Boot Starter过程全部完成,大家可以尝试根据自己的需求去定制Starter吧。~~~
Spring Boot 中文官方文档 https://www.springcloud.cc/spring-boot.html#production-ready
- 我的微信
- 加好友一起交流!
-

- 微信公众号
- 关注公众号获取分享资源!
-